Immersive Learning is something we have been aiming to achieve in education for decades, yet we often apply outdated methodology and technology resources to achieve this end. Now, in 2023, immersive learning, as a strategy and widely accepted pedagogical approach, is fully achievable and yields real gains in learning outcomes.
In 2016, when I chose an Augmented Reality client project for a class while in the Learning Design Tech Masters Program at SDSU, I could not even delineate between Virtual and Augmented Reality. Extended Reality (XR), as a spectrum of virtual immersive tech, was still sort of a “Pie in the Sky” technology in the eyes of most educators. However, within the first few days of my research, I was shocked to find that both Augmented and Virtual Reality were already emerging as practical and affordable education and training solutions that could truly immerse learners in exceptional ways, and this was back in 2016.
Specifically, what makes Virtual Reality ripe for learning is the way that the constantly evolving and improving technology achieves a sense of presence, which tricks the brain into believing that you are in a new environment, thereby creating an authentic immersive experience. This is done through quite powerful fine tuned sensory tech wizardry that most commonly addresses the main senses of the human body, like your visual, auditory and tactile senses (and yes, it can do smell and taste too, but that is beyond the scope of this blog). In doing so, users in VR experience something far more powerful than almost any well produced video, classroom activity or lecture could likely achieve. These experiences produce learning that extends to far transfer, so learners will recall the experience and the content learned within it as though they were actually physically engaged with it, yielding better retention rates. However, my own personal success with VR has not been in the traditional spoon fed learning experience sort of variety. In my classes, where I have used VR across various disciplines and grade levels in secondary as well as post secondary education for a few years, I have found the greatest success in XR Development, by challenging students to demonstrate their learning by creating a fully functional AR / VR experience (See The Z-Axis for more on this). Once you wrap your head around the fact that VR is something you are interested in using with your students, it is likely you will arrive at the How question.
How should we use VR with students?
These answers are going to be based primarily on my own successful experiences and research, as well as the examples I have heard first hand from other educators who embrace the power of VR in education. There seem to be some very typical types of learning experiences that can be divided into many categories, and these are some arenas of VR that are well documented and can be backed by the amazing research of Stanford University’s Virtual Human Interaction Lab (VHIL) expert Jeremy Bailenson in his book, Experience on Demand. These are not rigidly divided categories or genres, more like focuses that have a lot of room for overlap and intersection.
Empathy: There is no machine that can do what VR does for empathic connection. Consider the last time you felt emotion during a movie, sorrow, anger, frustration, joy, etc. Now consider how much more impactful that experience would be if you were actually there, and if your experience with it was unique, and only yours. The power of VR lies in its ability to teleport learners to distant locations that are inaccessible, put them in a context that is highly unique and connect them with humans (or avatars of them), artifacts and environments in ways video simply cannot. These experiences can allow us to feel a location or scenario dynamically and experience it as though we were actually there, alongside other users, avatars or real people.
Interactive: Books and graphics novels sometimes embrace a choose your own adventure model, but VR can allow for not just dozens of permutations, but infinite unique experiences. Gamified learning, virtual museums, escape rooms, crowd sourced virtual environments, and more; all of these are not only available to design from scratch, but in many cases, can also be customized, remixed or tailored to a specific learning need or outcome.
Creative Development: VR development platforms are amazingly powerful. They can be used to allow learners to experience what it is like to design, create and code a fully immersive experience that can be authentically developed, and deployed to a real audience. These experiences often integrate and connect the developer to libraries of assets and furthermore, allow for media upload, so they can add 2D graphics and 3D models, audio narratives or music, and even 360 video. This happens to be where my students in Gateway to Tech, as well as my adult learners at SDSU Learning Design Tech, have the most fun and get the most learning out of VR.
Which HMD to get?
In the world of VR, there are all kinds of Head Mounted Displays (HMDs) out there, but really, only a handful make sense for the purpose of learning, especially while on a tight budget working in schools. Recently, I was awarded the Unity Create with VR grant in 2022, and although I have experience with a variety of headsets, I will be emphasizing my recent work with one of these in particular, the Meta Quest 2 (formerly Oculus), the “Goldilocks” option for VR in education.
Mobile VR: These options that allow you to drop a mobile device into a headset are actually quite affordable, but only offer the same low level Three Degrees of Freedom (3DF) potential you would experience with a regular fullscreen mobile view (although there is some immersive value here and it does simulate more robust VR surprisingly well by using a stereoscopic split). With the further limitation of not being powered with the same consistent high performance tech that is integrated into most stand alone HMDs, these are not going to offer the same highly immersive experiences, and you will be limited to simple 360 video and somewhat diluted experiences, sans controllers in most cases. However, if you want the versatility of also having a set of mobile devices that can be dropped into VR and also be used for all of the other great things mobile devices can bring to your class, android apps, video, 2D and 3D scanning, etc., then these are not a bad option when you factor that into the equation.
Tethered VR: More robust options that connect directly to a computer definitely pack a punch in terms of realistic high quality visualization with higher Frames Per Second (FPS) and incredible spatialized audio. In most schools, unfortunately, even one of these HMDs is out of reach, because they often require a very powerful PC with upgraded graphics cards and specs that exceed the kinds of devices you probably already have in your most advanced tech classes. At a price point of $799 for something like the Vive Pro 2, with the additional limitation of being physically tethered to a computer, these devices are bulky, costly and probably a bit more than you realistically need for the kinds of experiences you want to offer in your school. Unless you are doing development with a pro level gaming Engine like Unity or Unreal Engine, these are somewhat unrealistic for general classsroom use.
Meta Quest 2: Unlike low power mobile HMDs, the Quest 2 offers six degrees of freedom (6DF) with two wireless controllers, and what’s more, this stand alone device is 100% untethered and has FPS stats and refresh rates comparable to devices that are twice the price. At $199 (as low as $189 refurbished), they seem to be the best value on the VR block. Weighing down heavily on the decision, is the Elephant in the room, the less than sterling reputation of tech giant Meta (Facebook). That being said, Meta now offers a device set up and login option that is entirely disconnected from their Facebook social media platform, which helps to appease the disgruntled facebook opposition within the tech and education community. Having invested over 10 billion in their XR projects in 2022, the giant has certainly done everything they can to build the best device around and a software platform to support the continued growth of the product line. Even a classroom teacher can afford (or pick up with a few fundraisers) a Quest 2 of their own. This device has both a rapidly growing app store with spectacular options for learning, as well as the ability to sync up to your gaming computer and run almost any of the options in STEAM VR, or find browser based VR options to connect to. All in all, you can see why I am so excited to have 15+ of these at my disposal for VR learning; their versatility, impressive potential for immersion and relative affordability make them the right fit for educational use.
Note: If you are just looking to dabble in VR, and see if it is a practical option for your school or classroom, you also have the option to do as I did initially before pulling the trigger and pick up a Quest 2 for around $150 used. There are some curriculum providers also offering free trials, and they will ship you a device for free to try out their stuff!
Logistics
Picking up a bunch of HMDs is the easiest part of this endeavor for most educators. The tricky part is all of the considerations and preparations that need to be in place to really be successful with this learning tool.
Set up: This is not exactly an EDU friendly process, and it certainly is not something that is all that well documented or supported by any manufacturer. Among the many challenges are initiating all of the usernames and passwords. Consider this from the perspective of a modern gamer: You have a specific account, connected to a single email or user account and you use that to buy each game you want to play while accessing that account on one specific device. This is not conducive to classroom use at all. Using the Meta Quest app library with a whole class, or multiple classes may initially become a bit of a head scratcher for you, so I’ll suggest these 2 options. No matter what, as soon as possible, you will want to reach out to your district and tech department to make sure they are onboard for helping with this process by approving the software (this was done by approving it all for the administrator credentials in my district), and testing a few apps on multiple devices along the way is a must.
Single User Login: I came across this suggestion in the Unity Facebook group. At first, I was skeptical, but this saved a lot of headaches and made for a less time consuming onboarding process when dealing with multiple devices (in my case, 15+). The Meta Quest app and OS will require a login, just like any other, so having just one account simplifies this, but also allows you to easily push out apps to users and makes managing accounts much easier. The downside of the single user account is that you may run into issues with running purchased apps/games at the same time. For instance, if you purchased the NatGeo app for the one account, and tried to have 5, 10 or all 15 devices login to the app together in class together, it would likely catch on to the fact you only purchased one app and loaded it to multiple devices, and then it may start booting people out of the experience, which we have seen happen. However, despite the many references I have seen online to this limitation, I have only run into the issue with more than eight Quest 2s running at once.
Multiple Unique Users: This is the best way to set all of this up if you are certain you want many users all in the same purchased app at once. Also, this will allow for custom settings, where each account could have its own unique profile, avatar and other specific details. Also, the students using the devices will sometimes (intentionally or unintentionally) make changes to settings, and this would only impact one device instead of essentially every device in the other case of a single user profile. For instance, I told students not to load unapproved games, and of course, on day one, there were immediate prompts coming in on the single user profile on each HMD to approve download for Gorilla Tag (a popular free game, not related to any or our learning goals). With individual accounts, you won’t have to worry about one bad actor trying to push a game, avatar or settings change out to every device, which is a significant issue when I have used this with middle school age students in particular.
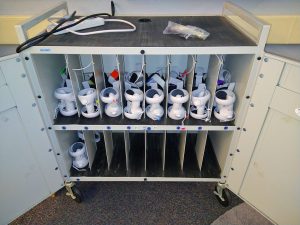
Storage: Unboxing and getting each device logged in and loaded with bookmarks and apps is a process, but then there is the storage challenge to boot. You will want a solution that works for your needs, so make sure to dial in what those needs are as you roll out your HMDs and start to experiment. First off, make sure you immediately mark numbers and/or letters on corresponding HMDs and controllers, they are easy to mix up, and when packing up at the bell, can be a real nightmare to get reorganized if they get mixed up. I mark each HMD/controller with a permanent marker and also use a color coded system so each number has a unique color 3D printed ID, which makes it easy to find which set of controllers goes with each HMD. I also have repurposed an old Chromebook cart on wheels and zip tied in the chargers to make for a lockable secure charging station. On average, I can use several of these at once in class and cycle through them, and plug them all in between uses and get multiple periods worth of use by cycling this way at the midpoint of each period. However, after a few 55 minute periods, you may start to see some that are totally drained by period 3 or 4 (so keep them all plugged in over lunch).
Wi-Fi: What is great about the Quest 2 is that you can load all of the apps/experiences beforehand, or get your first users in a bit early to load them, and they are on the device as a stand alone experiences that can be accessed anywhere (except outside, UV is apparently quite bad for HMDs). There are, however, lots of options that may have additional functionality once connected to Wifi that make the experience potentially syncable or social, so that the users can connect with one another while immersed. You will immediately notice that getting even 3 or 4 HMDs online for browser based activity simultaneously may bog things down substantially, to the point where computers in your room will slow down and user experiences in VR may lag or refresh rates may slow down, causing the experience to become glitchy. The best plan is to test with a few devices in a smaller class first, and then scale up incrementally. In my class, we have been able to run about 7-8 at a time, and that tends to be as many as we can run while the other 25+ students are on their chromebooks working on typical coursework, with only moderate slowdowns. Some larger scale experiences that require Wi-Fi and lots of devices to be in use together (8 or more) may require a dedicated router specific to the VR users and dedicated room. In some cases, high power routers/hotspots have been connected to the VR storage cart to keep everything in one place and secure a secondary Wi-Fi set up completely separate from the classroom or school’s infrastructure.
Keeping Everyone Safe
This is a serious concern, as I have sustained two significant VR injuries where I not only broke skin, but also scuffed up my controller pretty badly in one case. Even if you are not engaging in highly active experiences, VR can be dangerous for a number of reasons: VR sickness, guardians, seating and harassment.
VR Sickness: This is rarely a concern where students will get sick to the point of vomiting, but some users describe a feeling of headaches, nausea, dizziness and/or disorientation. This is due to a sensory conflict in the brain from the illusion of the VR experience and the reality of the environment and the brains conflict with the typical expected visual input (because the real word user is not moving in the same way as the immersed user/avatar in the experience). Many experiences with fast motion, flying, running and jumping, make users particularly vulnerable (Warplanes: Battles of Pacific is one that took me several days of playing to be able to acclimate to, and Mission ISS is another that slightly disoriented me initially).
There is a lot out there with information on what causes VR sickness, but what they don’t tell you is that younger users, especially in a classroom among peers, are going to be reluctant to clue you in on their VR sickness. (Doing a thumbs up-thumbs down check in with users every few minutes is a simple system to have in place.) First off, they don’t want to look weak or make themselves look inexperienced with the technology, so they may try to save face by pushing through or hiding symptoms. Secondly, they are in many cases genuinely having fun while simultaneously feeling sick, so they may feel compelled to persevere because they know that making the instructor aware of any symptoms will put an end to the experience.
Guardians: In almost all cases, you will want to keep your class in a stationary guardian, which limits their range to just a few feet in any direction from a seated point, then they will start to transition into passthrough. However, this limitation of a few feet is a bit less restrictive than some students will need. In particular, from my experience, students who have ADHD or other challenges that generally make it difficult for them to stay seated during instruction, may be inclined to try to move around or stand up during their learning experience. Stationary boundaries are best accompanied with soft and safe physical objects that act as both boundary centering markers and limitations for their experiences. I plan to suspend pool noodles attached in a circle from a cable (sort of like a clothesline, see figure below) to prevent users from accidentally running out of their guardians as an added layer of protection. In some rare cases, if space allows, students may be able to create boundaries and move about the space, but watch out for trip hazards and even unsuspecting furniture (I once caught a heel on a couch leg corner that was way behind me after getting too deeply immersed in Creed Boxing, and it quickly ended that experience for me with a huge gash and bruise on my foot).
Seating: Keeping students in chairs may work, but this can cause them to try to move chairs to reorient during the experience and see all the way around, which is not safe while in VR, blind from the real world. On the other hand, rolling office chairs may cause temptations to roll around or spin while in VR, which is bad for both VR sickness and increases likelihood of unexpected blind physical contact, which can get dangerous. The best option is a traditional science lab or shop stool that allows them to reach the ground with their feet, but sit sort of on the edge. This way they can easily move around the full 360 degrees of the environment, but not spin, and if the requirement is that they stay seated, they should be fine separated by a 4-5 foot radius, so you can pack them in a bit closer, while still giving them 360 degrees of potential view. In general, the best test is to have them stand in position in front of their stool and lean as far as possible toward one another to test their proximity. If their controllers are less than one foot apart while fully extended with arms out, move stools away until their controllers are at least one foot apart. Another tip, use masking tape on the floor or stickers to mark where the legs of the stools are, this will prevent having to reset the guardian regularly if stools move. As long as you use the same stool location with the same headset, this will speed up transitions for each user so that the stationary boundary will already be set.
Harassment: This one is two fold, as there are both digital and physical harassment considerations. The class bully will find easy prey while their targets sit blissfully blinded by a VR HMD, vulnerable to physical poking and prodigy or being pelted by a paper wad from afar. The key is to make certain your students who are not in VR are occupied, engaged and tasked with something significant (ideally from a good distance away). I am very fortunate, I have an active learning area in my lab, connected to the classroom, but slightly partitioned from the classroom by a partial wall. Setting up a sheet partition suspended from a ceiling or creating a barrier to prevent distractions to the rest of your class that is not in VR is probably worthwhile, and this may also mitigate the wanderers of your class from trying to easily sneak into the VR section of the room. This is where a VR spotter comes in handy, as they can help with keeping users in their boundary areas and also keep unwanted users away from those in the experience. If a TA is not available, having a rotation where the learners who just finished their round help to get the next group in and set up, (with some responsibility for supervision) is a great practice if you have the space to keep them all in there or in the safer corners of the dedicated VR space.
Beyond the physical challenges of harassment, there are other safety considerations once in the virtual environment with trolling, anonymity, and other obstructive behaviors. To start with trolling, there may be known or even unknown intruders who infiltrate your VR learning space (think zoom bombing, but in a Virtual World), and this is particularly prevalent to browser based social VR spaces and VR worlds like VR Chat. These scenarios are rare, as long as you are using tools that you deem to be safe from external intruders by adjusting access settings and even testing the environment links and what kinds of users can get in. If possible, lock it to your domain or user lists and take roll in the environment. Also, make sure everyone who is in your space for learning exercises is actually who they claim they are and that they are not a troll or predator. The more likely challenge will be once you get groups of students into a social VR space. They may physically obstruct or prevent another learner (in this case their avatar) from moving by huddling around them, or block their view intentionally. In other cases, just like in the real world, they may comment or send chat messages saying mean things, and while suited up in their avatars, they may become more emboldened to do so, thinking they can get away with it, as they feel more anonymous than they are. Social VR is a ton of fun, but I have less experience with it, as most of what we do are single user experiences because social VR is more to manage, and heavier on bandwidth too.
Tools and Options
In any extended reality tool you use, there are likely custom settings, and in development tools, there will be assets and entities already there for users. Oftentimes, students want to customize beyond the options provided and that is where 3rd party tools come into play. For instance, CoSpaces offers image uploads, 3D files, and all kinds of media options that can be added to the experiences from other external sites or creation tools. Similarly FrameVR has upload options and even 360 video potential. A new tool that recently came onto my radar, which we have only used for 3D gaming in my classes, not VR yet, is PlayCanvas.It is also integrated with 3D models from SketchFab. Regardless of what youchoose, here are some great options for creating with your development projects in VR:
Recommended VR Experiences for Education